Monday, 9 January 2023

Legendary Jacket Item - Texturing and Final Steps

Texturing

For texturing, I started with the biker jacket. I made the base for the leather texture using a height layer with a black mask to which I added a Fill with a Cells procedural. I also used levels in order to have more control over the mask. 


I then added some roughness variation as well as some dirt using procedurals, since the jacket is supposed to be a rebel's jacket and hence, less better kept and dirty. 


I also added some blood stains since they give a nice effect and more variation to the texture, as well as another story element to the piece. Why is it bloody? Who did they fight? 

Using mask editors I added some ambient occlusion and very subtle edge highlights.


Following my concept, I drew a Skull design in Photoshop, then used it as a mask for the drawing on the back of the Jacket. I added dirt, roughness variation and used a blur slope filter in order to create the rough edges of the skull and blend them nicely with the dirt texture, making it look worn out and faded. 


Using designs I drew in Photoshop and height layers, I made the badges. The big "A" letter textile badge was supposed to be made in the same way, but the folds of the jacket showed through it, so I ended up making it using geometry. I added some rougher spots to the smaller badges, as if the plastic was old and dirty and some dirt. I had to mask out the leather texture underneath manually, but it was worth it in the end. I think the badges add more personality to the jacket, a playful yet deadly vibe. The person wearing this is definitely not sane (The "A" stands for anarchy, for the record :)) ).


For the metal, I used an old metal texture I made and modified it for more wear and tear, added some rust texture and the blood spots, as well as highlight the edges using two lighter layers and a mask editor generator: one for the softer, bigger highlights and one for the finer ones. 

I also added the emissive layers and masked out the rest of the textures in those places. 


And this is the outcome:


For the military jacket I made a textile mask using substance designer and imported it into substance painter in order to get the material height detail. 


I then added the base colour as well as some ambient occlusion and edge highlights using mask editors. Using procedurals, I gave it some subtle colour variation too. 


For the metal, I used a gold texture I made a while back, this time taking out some of the wear and tear layers and changing the colour slightly, in order to make it seem newer and well kept. I also added the details on the gold trim and sleeve cuffs using a height layer, then baked them into the normal map. 


I wanted the medals to look really shiny, maybe even over polished, so I only added some roughness variation and fingerprints using just roughness layers. I also gave the edges a lighter, greenish glow, as if they'd been polished too much and to add in some colour variation.


I then added the emissive bits and this is the outcome:


For the mannequin I used a layer of a dirty white colour and set the roughness low so it would look like the shiny material used for fashion mannequins in shops. I added some colour and roughness variation using procedurals and some ambient occlusion using a layer with a black mask and a mask editor.


Final Steps

I took everything and put it together in Engine, built the lighting and the materials. Using the emissive texture exported from substance painter I also made the pulsing dynamic material. 


I had a little problem with some stretching on the military jacket textures, which weirdly didn't show in substance painter, but I fixed it by hiding the seam of the UV underneath the gold trim rather than have it come straight down on the jacket. Even weirder, though, this didn't show up on the biker jacket, which had been unwrapped in the exact same way. 

I had a similar problem when presenting my work in Marmoset, but importing the mesh from Substance Painter somehow fixed the problem. 

And the final product:


Thursday, 10 November 2022

Character Brief: The Captain - Sculpt

For the body base, I used a stylized female bpdy I had sculpted during the summer and modified it in order to make it male.


I widened the ribcage and shoulder width and flattened the chest as well as straightened some of the curved shapes to give it more of a masculine look. I didn't really do much for the legs as one would be chopped off in the end anyway (oh God that sounded horrible) and the other one would be covered by the trouser leg and the shoe. 


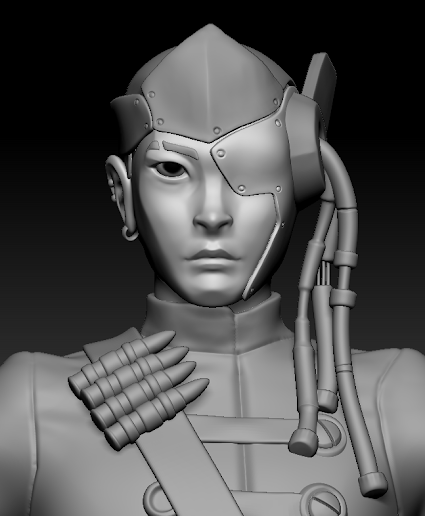
I then sculpted the face using clean shapes, defined planes and sharp edges to give it the stylized look. 


I then started blocking out his helmet by extracting and Zremeshing the pieces and adding the round piece and the wires. I think I managed to somewhat recreate the shape of a tricorn hat and the braids that pirates would wear through the cables flowing from the helmet. Also, the metal piece on the face gives the impression of an eyepatch, with I am really pleased with.

I then Dynameshed the head and body together to make them one single object and smooth out the transition between them. I Zremeshed and used Project in order to project the old details into the new mesh.


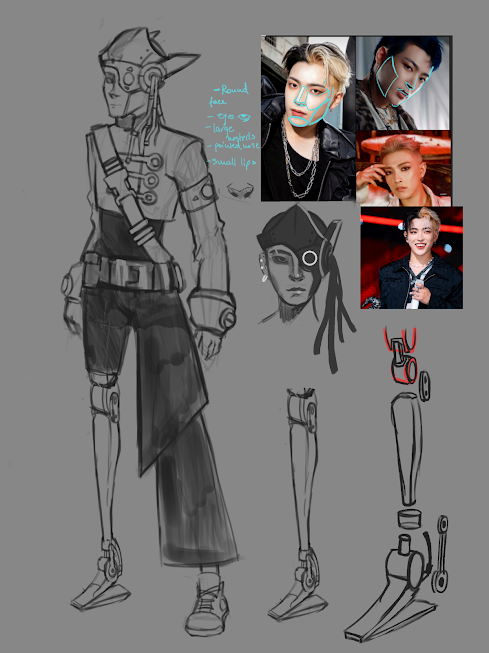
I built the prosthetic leg in 3dsMax as it was easier and faster for me to do so. I had to review some of my design choices as they weren't properly fucntional, but came out with better, more practical ideas in the end:


I then cut off his leg (I can't word this better, I'm sorry) and replaced it with the prosthetic one. At first, the knees were too high up even for a stylized character and had a really weird unnatural shape to them, so I used Transpose Master to shape it metter and bring the knee down. I moved the pieces of the prosthetic leg around in order to bring the hinge at the same level with the other knee, so he could realistically be able to walk.


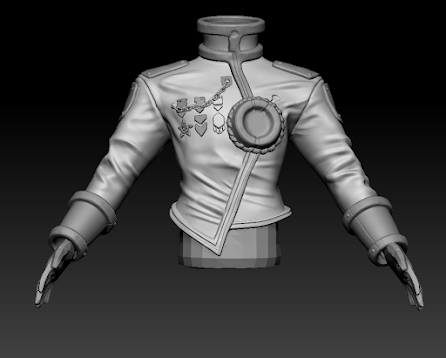
I took a Zremeshed version of the body into Marvelous to make the clothes. The first version of the jacket was too tight and it looked like it would rip off him with any move. No matter what I did though, something looked awkard, so I had to build the jacket once more/


This is the final version of the Marvelous Designer outfit:


I then quadrangulated it and brought it into Zbrush. I welded the pannels together, Dynameshed and Zremeshed the clothes to fix the weird topology, then used Dam Standard to redo the impression of seams on the outfit.

By extracting and appending shapes, I built the rest of the details, keeping them as clean and sharp as possible, as they are not only stylized, but also hard surface. 

Overall, I'm quite pleased with how he looks. I will proceed to retopping after adding the final touches and details and polishing all the bits and pieces. 


Character Brief: The Captain - Research and Concept

For the captain project brief, I decided I wasn't going for the basic 17th Century pirate Captain. The theme the brief offered was too open ended and gave too much room for interpretation and creativity to not take advantage of that. 

Being used to and pasionate about history and fantasy, I had never really tried something sci-fi or cyberpunk themed, so I decided that this is a good time to experiment with it and hard surface details as well, since it can't be missing from a cyberpunk character, right? I also decided to make the character stylized, since I enjoy it and the last year character project didn't allow me to go all out with the sylization and show my own style.

I first did some general research to get an idea of what I wanted to do. I thought I would take something familiar -  a pirate -  and place it in a context where it would normally be odd: the future. How would the environment affect him and how would the concept of a pirate change in order to fit the new environment? 


The story of my new character gradually took shape in my mind as I worked on the concept: In a future where the social classes have returned in the shape of conglomerates versus the normal people, I young orphaned boy steals to get by every day. Until one time he is caught and beaten almost to death by the authorities for stealing an insignificant amount of money from a rich man. The boy barely survives and is left disabled: his right leg is broken and gets infected, so it has to be removed and his eye.. let's just say it's missing. He makes up fot these through prothetics and cyber enhancements and as he grows up he becomes a pirate in order to steal more than a few pennies from the rich. 

I did a bit of research into prosthetics and got some references to make sure my design is accurate and functional.


I also brought into my moodboard one of the characters I began sculpting during summer, to use her as reference for the type of stylized I wanted for this character and maybe this way showcase my signature stylized art style. 


I wanted to keep the basic shape language and visual symbols of a pirate: The tricorn hat, the longcoat and the peg leg, while completely reimagining them in a cyberpunk context. 

These were the iterations I came up with:


I chose the last one, a mix of the second and third one, as I think it brinks together all of the best details from the other iteration while conveying the visual image I want. 

I also detailed the face, to have a better idea of how I was gonna sculpt it. I chose some photos of a guy from Pinterest that I thought fit the vibe of my pirate captain and observed his features in order to exaggerate and stylize them. He had to look young, maybe a bit too young for a pirate captain, yet still demand respect. 

This is the final concept: 


Legendary Jacket Item - Retop, Unwrap and Bake

While retopping the jacket, I did my best to create proper deformation loops for the shoulder and elbow area that would enable it to deform without breaking the shape. I did my best to keep the topology as even as possible. For details such as the chest piece and medals I used triangles in order to reduce topology. I believe that won't cause any problem with deformation in a game, as the chest piece is made of metal and wouldn't need to deform. It would be simply skinned to one single bone. 

At first. I simply concentrated on getting the topology done, the cleaned it afterwards, straightening up the lines and inserting loops where the topolgy was too simple and uneven. 


Looking back, the trim around the chest piece could have gone with less topology, but I was still far from the budget limit of 16000 tris with a final tri count of  13,512   for the military jacket. 

I then unwrapped it, trying to keep the seams to a minimum and as hidden as possible. I straightened out the pieces as much as I could without causing distorsions in the unwrap, in order to better pack them together. I split the jacket into two UV sheets using material ID's: one for the jacket and one for the metal pieces and details. 


For the biker jacket skin, I simply took the military jacket, took out the medals and modified the trim around the chest piece, as well as retopped the shoulder pads and the spikes. This way, I didn't have to redo the unwrap for meshes that are esentially almost the same. I then unwrapped the new details and added them on the UV sheet in the place of ones I took out. 

The biker jacket ended up with a final tri count of 11,982.


I then prepared the jacket for baking by doing a last check for any kind of errors, checking the naming of the high and low polys and vertex painting the high polys in order to be able to generate colour IDs in Substance Painter. 

I took the jacket into Substance Painter and baked it. The bake came out quite well, with just a couple of errors that I had to paint over manually in Photoshop. Overall I was really satisfied with how the bake came out. 


Now the jackets are ready to be textured and finalised. 


Wednesday, 9 November 2022

Legendary Jacket Item - Scultping

In order to achieve the base of the jacket, I decided to experiment with a new softwear: Marvelous Designer. I retopped and brought in my mannequin in order to make sure that the jacket fits it afterwards. 

For the mannequin, I didn't dwell on deformation loops or avoiding triangles at any cost, as I knew it wouldn't move in the context of a hypothetical game, and half of it would be covered by the jacket anyway. 

After bringing it into Marvelous Designer as an avatar, I had to set the bounding volumes and arrangement points as the program hadn't managed to do it on my mesh. Thankfully, it didn't take a long time, and the arrangement points were helpful later on, when arranging the material on the mannequin.


I used examples of military jacket patterns I had researched and added some of my own ideas too in order to get the shapes in my concept drawing. I first made a basic blowse pattern then started to shape it to my liking. I used "darts", triangular cuts made into the material in order to make the jacket more fitted and give it the stiff, triangular shape.


After getting the basic shape, I just adjusted some of the shapes to make sure it fit the way I wanted it too and that I could get the folds I was looking for. I then quadrangulated it and sent it to Zbrush. Unfortunately, I hadn't set the particle distance properly, so the topology was too low and the level of detail on the folds was lost. I couldn't figure this out in that moment, so you'll see I had to sculpt some of the detail back in Zbrush, though the indication of fold shapes was still helpful. 


I welded together the pannels that made up the jacket using Weld Points and then regained some of the seam indents using ZModeler. On this occasion, I got the chance to practice ZModeler, which I had been reticent using until now. 

I then used the base to build up my jacket and made all the metal bits and details in Zbrush. Since they were simple shapes, it didn't take long, though I spent time making sure they look polished enough, as they are hard surface. As for surface details, I kept the damage low on the military jacket, since it's supposed to look clean and distinguished compared to the other one. I made the medals in 3ds Max and then polished them in Zbrush.

At first, there was no trim around the round piece on the chest of the jacket, but after getting some feedback, I decided to add it as a decorative piece in order to mask the sharp transition between the chest piece and the jacket surface. I also added more folds and inflated the edges of the panels a bit in order to give the impression of how the pieces on a real military jacket join together in the shoulder seam area. 


For the biker jacket skin I simply modified the shape of the metallic shoulder pads in order to give them a sharper more aggressive look, and added spikes on top, as well as more surface wear and damage on the metal. 


The rest of the details I will add in Substance Painter, in order to hopefully keep a non-destructive workflow and be able to change things on the way without spending too much time going back. 


Saturday, 8 October 2022

Legendary Jacket Item - Research and Design

Before starting to design my jacket, I took note of the requirements specified in the brief: The project would have to include both a mannequin and a jacket presented on it. The mannequin should only have the torso area, should be headless and should have arms. The coat should have two variants/skins, at least 3 materials and a dynamic material. 

The idea that came to mind in order to incorporate the dynamic material was a cyberpunk/sci-fi style jacket with glowing pieces. I then researched and put together a moodboard. For the real-life inspiration I looked into military jackets as well as bomber jackets and goth fashion. One of the jackets is going to be a military style one, tidy and proper, maybe of a soldier/guard/policeman type of organization, with medals and gold/silver patterns. It could belong to a faction enforcing the law. 

The second design of the jacket would keep the shape of the initial one but would have more of a bomber-style jacket. It would have a more rebellious vibe, as if the initial military jacket has been stolen and maybe modified by a group protesting against the ones enforcing the law. I searched for inspiration from cyberpunk and goth fashion as well as colourful badges to replace the military medals.


I also looked at examples from video games/animations, like the outfits from Cyberpunk 2077 and the enforcer uniforms from Arcane.


I took a look at how skins and different outfits are designed in games, what makes them different yet still the same. I looked into designs from Overwatch and Cyberpunk 2077. Colour as well as shape language in the design are changed in order to best fit the mood the creators wanted to convey. Compared to the classic design, Reaper's Nevermore skin, for example, has more pointed and curved shapes, repeating the shape of the beak on his mask and the theme of the raven. 


I gathered some inspiration on shapes that would be evocative of the cyberpunk/sci-fi genre, to use in the design of the medals and badges maybe. 


I then iterated using all these ideas. The ones on the top are the military jackets and the ones on the bottom their "rebel" variants. 


I chose option three in the end, as it best conveyed the idea of a military jacket, and it gave the vibe of a pilot jacket, which would be a nice detail and give opportunities of storytelling through details. I also liked the tonal variation in its rebel variant. I wanted the sleeves to be from a different material, much like some bomber jackets are, which would give a mismatched and dishevelled look. Even so, the difference between the designs wasn't striking enough. I took the iterations to a new slide and tried to add some more details to the rebel jacket. 


I tried to design the medals for the military jacket in a sci-fi style, using the shape language I researched on my moodboard. For the colours I chose from a deep blue and a mix of white and gold. I settled on the white and gold in the end as it gave it a royal and clean image as well as made the difference between the jackets more striking (since I planned for the rebel one to be black). On the back of the jacket, I drew a stylized eagle to signify that the jacket belongs to the aviation, as well as symbolize virtue and courage. 


 For the rebel jacket I went for a goth biker jacket and tried to make the collar resemble a goth choker necklace by adding the screws around it. I also tried to make the shapes more aggressive and added some spikes on the epaulets. Instead of gold, the enforced bits would be of rusty and scratched metal. The main part of the jacket would be made of old leather and the sleeves of polyester, like bomber jackets. Instead of the medals I plan to add badges with rebellious and weird designs, similar to the ones teenagers put on their bags and jackets, by using decals. I also added an initial, drawing once more inspiration from bomber jackets, and plan to add it using a decal too. 

In the meantime, I've also made the mannequin, though I might polish it a bit more, especially the forearms and hands as they seem a bit weird. 


Major Project - "Gold": Texturing The Zmeu

 The texturing for Zmeu was the most tedious out of all of them. I used fill layers and masks as much as possible to give the scales some de...