Thursday, 3 March 2022

Animal Project: Retopology, Unwrapping and Baking

The retopping and unwrapping went smooth overall, but for some little setbacks. When making the deformation loops for the face I failed to actually make them loop around the eyes and mouth, so I had to redo them. Once I got the hang of it though, it went quickly. 

I retopped one part of the fox and mirrored the other half in, but after mirroring it, the loops broke again. I am not sure if it's because of the modifier or something else happened, but I managed to fix and make them loop properly pretty quickly. 

After retopping the saddle too, I was still a lot underbudget, so I added more topology using the Swift Loop tool. I ended up with a final count of  18,572 tris for both the fox and the saddle. I also added material IDs to it so it would make it easier to texture each part individually in painter while still having the whole model baked together. 


I then unwrapped the body and the head onto two different UV sheets. I didn't try to straighten them, since it's an organic shape and it wouldn't have worked, I tried to use the space as best as I could, though there is always space for improvements. Still, I believe I am getting slightly better at using the UV space, even if it isn't perfect. 


For the saddle, I straightened the bits I could without deforming them and it made it easier to fit them on the UV sheet. 


The eyeballs I just cut in half and made the back part smaller as it wouldn't be visible.


I baked the fox in Substance Painter. The bake came out well but for a few errors on the normal and ambient occlusion maps, spcifically on the saddle. I tweaked the model and baked it again. This time, there were less errors and I could paint over them in Photoshop. 

This is the baked model:


Animal Project: Sculpting the Fox

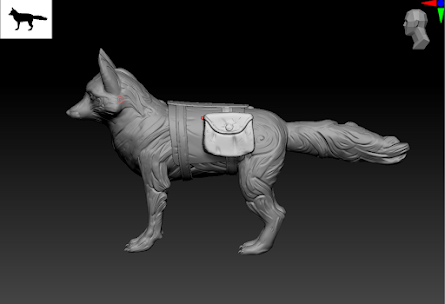
The fox sculpt was quite enjoyable to do, and I am really happy with how it turned out in the end. I could also definitely see an improvement in how fast I sculpt, as it didn't take nearly as long as other times, even though I had to sculpt an animal, which is quite a complex thing. 

I started by making a block out, starting from a sphere for the head and then using symmetry and inserting shapes to build up the main forms. The legs were a bit long, so I shortened them, before proceeding to sculpt details. 


Here is where I made a mistake. I hadn't noticed the toes had merged together and messed up that part of the mesh. I had already sculpted a lot of the detail for the face and started the body, so starting over was definitely out of question. Thankfully, there was an easy fix for it: I duplicated the mesh and fixed it, then transferred the details from one mesh to the other using Project.


I continued sculpting the pattern on the body. At first, I had made it too plain compared to the head, going in a straight line across the fox, which didn't offer much interest. So I changed that into a more curved, swirling pattern that still followed the shape of the body, but in a more interesting way. 


After sculpting the fox itself, I sculpted the saddle too: I first made the base using Extract for the blanket and ZModeller for the harness straps. I sculpted the bags from a square, softening it's edges by subdividing it and using the Move and Trim Dynamic tools. I added some detail using Mallet Fast and Orb Cracks and it was done. 


Backyard: Decal, Implementation and Presentation

Making the decal and putting the scene together were the last steps of my project. For the decal, I needed something to break the repetition of the cobblestones and also to give the tree a hole in the pavement were it could be growing from. So I made a decal for that, with cracks at the edges. I first sculpted it in ZBrush using Mallet Fast and Orb Cracks: 


Then I took the resources into Substance Designer and began editing them to make the decal. I used the grass and flower nodes from the cobblestones to keep the same look for the flowers, since they are the same as the ones sprouting from between the stones. I added a bit of noise to the cracks, but otherwise I kept it simple, to match the rest of the floor. 


I then took everything into Unreal and started building up my scene. I added blue lights to the windows and fire (that I had built beforehand using a particle system and aiming for a stylized, cartoony look), to make them glow brighter and have a bigger impact. I added warm light to the lamp. I love how it contrasts with the cold one from the fire. 

This was the final result:


I think it turned out alright, although there are some things I would change now:
- add more colour variation to the tree crown
- add something to frame the scene and not make it seems so empty (like some wooden posts framing the wall and maybe a little part of the roof of the house on top of it.)
- I also would make the tree trunk a bit less shiny, cause even if it's stylized I could have toned it down a bit. 

Overall, I really like how the assets turned out, but I think I could plan out my scenes a bit better. 


Major Project - "Gold": Texturing The Zmeu

 The texturing for Zmeu was the most tedious out of all of them. I used fill layers and masks as much as possible to give the scales some de...